Lunar Client is proud to introduce Rewind, the most comprehensive clipping, recording, and editing software fully integrated into Lunar Client! With Rewind, you can record your Minecraft without the need for any external software—except Lunar Client, of course.
Rewind offers a wide range of features. Just like most editing software, you can import video media that you can organize and trim. Since Rewind is specifically tailored to Minecraft and Lunar Client, you’ll have the ability to simulate all 75+ Lunar Client mods on your screen. This article covers how Rewind works, what sets Rewind apart from other mods, and how you can take advantage of all of its amazing features!

Setup and Installation
To begin using Rewind, ensure that you have downloaded Lunar Client by visiting https://www.lunarclient.com/download and downloading the appropriate installer according to your operating system. Once you’ve downloaded the Lunar Client installer, run the file and follow the prompts on screen—the Lunar Client launcher will automatically open once you’ve finished installing Lunar Client.

After you’ve opened the Lunar Client launcher, select a Minecraft version from the version selector by clicking the 🧩 icon on the left side of the launcher. Fortunately, Rewind is available across all Minecraft versions on Lunar Client so you can use a version of your choice!
You can access Rewind’s settings from the Lunar Client main menu. Simply press the Rewind icon at the bottom and then click on the ⚙ button at the top.
Recording a Rewind
To start a new recording, press Shift + R on your keyboard. You’ll notice a red circle at the top right of your screen, letting you know that Rewind is recording your game. To stop the recording, simply press Shift + R again. You can also pause recordings and add markers to help you edit your Rewind later; however, you’ll need to manually set keybinds for these features, which you can do inside Rewind’s settings.
You can also begin recording a Rewind from the Minecraft pause menu. Simply press ESC, hover over the Rewind indicator, and then click Record Rewind. From here you’ll also be able to pause and end your Rewind recording.

Miscellaneous Recording Features
With Rewind, you can also record your microphone and system sound, allowing you to clip funny moments with your friends while also including your conversations. To enable audio recording on Rewind, open the Rewind mod’s settings and then toggle both Record Microphone and Record System Audio.
Within Rewind’s in-game settings menu, you can also have Rewind automatically record upon joining a server or world, continuously record upon world and server switches, as well as backup your current recording in case of an unexpected game shutdown.
Editing a Rewind
Once you’ve finished recording your Rewind, it’s time for you to edit and export it. Editing a Rewind is a fairly simple process. Let’s go over the basics of the Lunar Client Rewind Editor below.
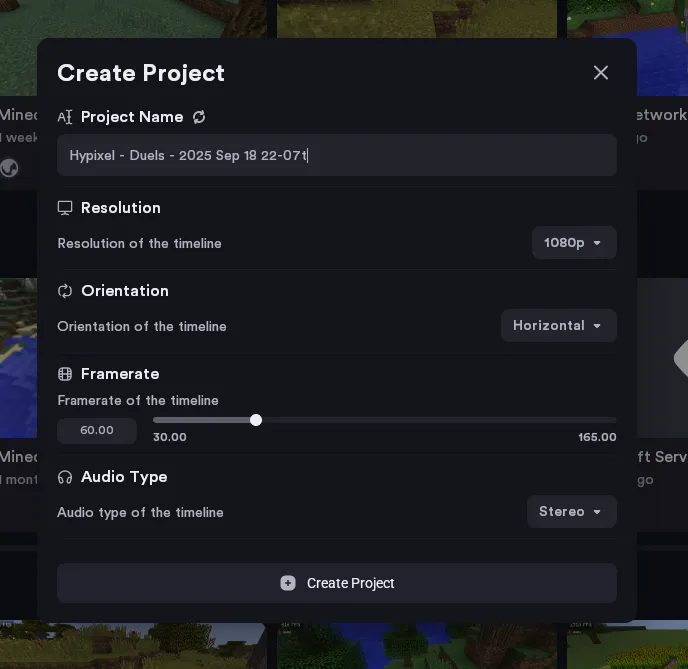
Accessing your Rewind and Creating a Project
To begin editing your Rewind, access the Rewind Editor from the Lunar Client main menu by clicking the Rewind Editor button at the bottom of the screen. This will open the Rewind Editor, where you’ll see all of your previously recorded Rewinds as well as projects. If you simply wish to view your Rewind, select your Rewind and then press Quick View. If you want to edit and export your rewind, click it and then select Create Project, which will open your Rewind inside the editor.

When creating a new project, you’ll be able to tweak a variety of settings for your Rewind, such as the name, resolution, orientation, frame rate, and audio type. These options are all part of our efforts to give you a highly customizable in-game video editor.
Rewind Preview
Inside the editor, you’ll notice a preview window on the left side, allowing you to preview your rewind and any edits that you may make. You’ll also notice a toolbar at the bottom of the preview. From this toolbar, you can split media with the cutting tool, unlink media, as well as fit the timeline to your screen. You’ll also be able to pause, rewind, and skip forward using the same toolbar.
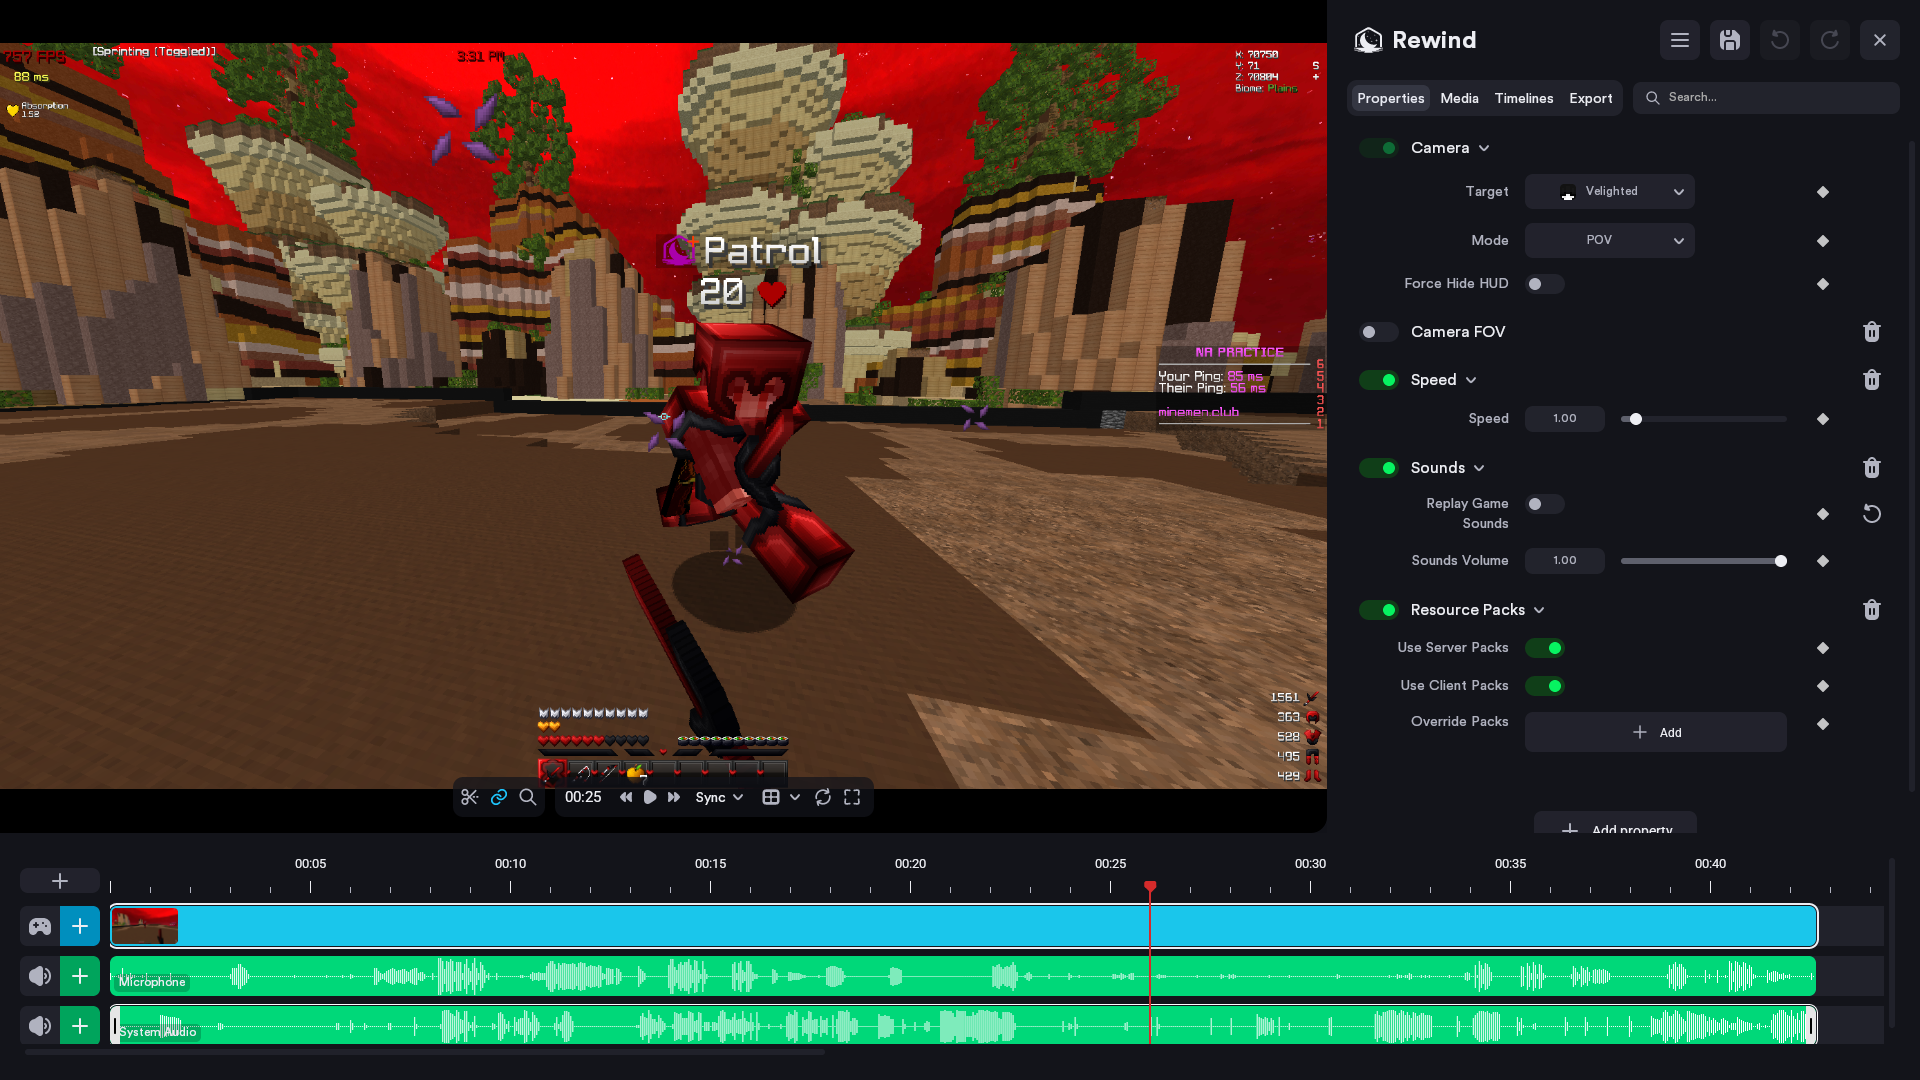
This toolbar allows you to change the preview mode from Sync (default) to Flight. Flight mode allows you to fly around your Rewind clip without impacting the camera path. Note that after changing the preview mode to Flight, you’ll need to hold left click over the preview to move around your Rewind.
Timeline
The timeline is where all your clips, audio, and effects are organized. On your timeline, you’ll notice three different tracks for effects, video, and sound. There are also three different layer types for effects, text, and images. The different layers will only be visible once the corresponding media has been added to the timeline.
Keyframes
Within the timeline, you can use keyframes—markers that define the start and end points of animations and effects over time—to adjust various properties of your Rewind. Keyframes allow you to fade in and out your Rewind’s audio, zoom level, brightness, color, as well as all other properties, and even Lunar Client mods.
To add a keyframe, first select your start point on your timeline, then click the diamond icon next to any effect, layer, or property within the Rewind editor. Next, select your end point on the timeline and click the diamond icon again.
You can modify your keyframes by clicking on them on your timeline. This will open a menu, from which you can alter your keyframe’s interpolation as well as determine whether it should fade in and out.

Adding Effects
We’ve also implemented a comprehensive effects system in the Lunar Client Rewind Editor. To add an effect, click the + button next to the ✨ icon at the bottom left, then press Effect. Next, select your effect on the timeline and then click + Add property from the Properties tab.
Here, you’ll be able to choose from a variety of different effects, camera shake, chroma key, and so much more. You can even add various aspects of the Minecraft experience, such as resource packs and shaders. Through the UI Rendering tab, you can also render elements of Minecraft UI, like the scoreboard, boss bar, and much more. Additionally, we’ve added the ability to enable and render all Lunar Client mods in your Rewind. So whether you’re attempting to showcase a new texture pack or change the time of day via Lunar Client’s Time Changer mod, we’ve got you covered.
Importing Media
Lunar Client’s Rewind Editor also allows you to import external media from your computer, such as images and audio files. To add outside media, open your Rewind in the Rewind Editor, then click the Media tab at the top right. Next, press Import Media and then select the file that you wish to add to your Rewind. Finally, drag your imported file onto the appropriate track at the bottom of the Rewind Editor.
Exporting a Rewind
Once you’ve finished editing your rewind clip, you can export your project to your computer. To start, go into the Export tab and adjust the settings to your liking. Within the Export tab, you can adjust the File Format, Codec, Encoder, Resolution, and Audio Settings.
Shadow Rewind
If you’re someone who forgets to hit that record button, we’ve got you covered with Shadow Rewind! Shadow Rewind is a feature that allows you to record the last X amount of time in case you forgot to hit the record button. Accidentally missed an insane PvP combo or a funny joke? Don’t stress! Shadow Rewind will automatically record and save the last few moments.

To enable Shadow Rewind, access Rewind’s settings and then enable the Shadow Rewind feature. Here you’ll be able to set a keybind for Shadow Rewind as well as customize the amount of time that Shadow Rewind should save.
Once enabled, you can record a Shadow Rewind by either pressing your assigned keybind or by pressing ESC to open the Minecraft pause menu, and then hovering over the Rewind indicator and clicking Save Shadow.
If you have any questions or are experiencing issues with your client, create a ticket on our Support Website or join the Lunar Client Discord server! If you are unsure of how to create a ticket, please view the Lunar Client Support Guide.